The front camera doesn't work after replacing my iPhone 5 lcd screen. The camera app opens, but when I try to flip to front camera it is a black image and the camera freezes.How does this happen?
There are a number of factors that can contribute to the failure of the front camera/ proximity sensor/ambient light sensor.
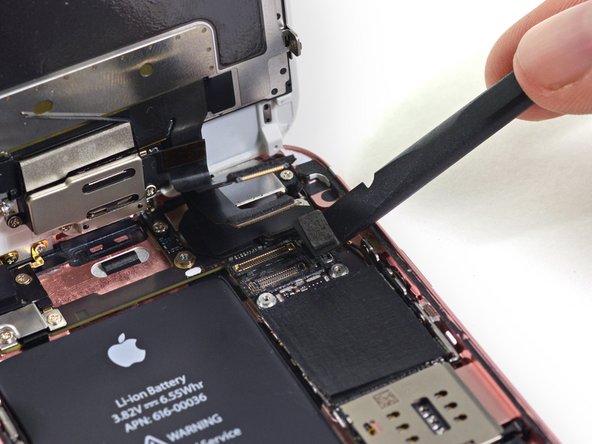
What I would do is first check if the connector is properly seated on the socket itself. Usually it snaps into place. Next, I would check the pins on the connector and the logic board itself. Usually, the tiny gold pins on the sockets can be damaged from forceful installation of the connectors, which is not good. Always always always remember that if a connector does not want to snap on to a socket, do not force it or else damaged will be ensued. It has happened to me before.
Next I would check the installation of the camera/sensors on the screen. Was the camera lens holder and ambient/proximity sensor gasket transferred and properly seated onto the new screen? Are the screws present and properly torqued down on the earpiece bracket? Over tightening can cause damage and other problems. Is the earpiece and its bracket properly installed?
Lastly, I would check the flex cables themselves. Are they pinched or severely folded? This can potentially cause problems. The flex cables should only be formed in round or U shapes. The flex cable that connects the ground copper sticker on the back of the screen shield is an exception since it already comes looking messed up.
I'm not too sure if the copper sticker that sticks to the back of the screen shield would make a difference. I have gotten the camera and everything else working without it. However, I do suggest that you do reinstall it since it seems like it acts as a ground to complete the circuit.
Forgot to add one more thing. Restoring your phone would more than likely not do anything. It's usually not software related but if you do feel very confident that a restore would perhaps fix it and you backed up all your data, then by all means go for it.
Monday, March 14, 2016
Wednesday, March 9, 2016
How to Fix Your Black iPhone Screen?
Your iPhone is on, but the screen is black.
Your iPhone rings, but you can’t answer the call. You’ve tried resetting your
iPhone, letting it run out of battery and plugging it back in, and your iPhone
screen is still black. In this article, I’ll explain why your iPhone screen
went black and what you can do to fix it.
A black screen is usually caused by a
hardware problem with your iPhone, so there usually isn’t a quick fix. That
being said, a software crash can cause your iPhone display to freeze and turn
black, so let’s try a hard reset to see if that’s what’s going on.
To do a hard reset, press and hold the
power button (also known as the Sleep / Wake button) and the Home button (the
circular button below the display) together for at least 10 seconds. If the
Apple logo appears on the screen, there probably isn’t a problem with your
iPhone’s hardware – it was a software crash. You can find a quick solution to
this software crash problem by searching on the net. If the Apple logo doesn’t
appear on the screen, keep reading.
Why
Is My iPhone Screen Black? Let’s Look Inside.
A brief tour of the inside of your iPhone
will help you understand why your screen is black. There are two pieces of
hardware that we’ll talk about: Your iPhone’s display and the logic board.
The logic board is the brains behind the
operation of your iPhone, and every part of your iPhone connects to it. The
display shows you the images you see, but the logic board tells it what to
display.
The entire display of your iPhone is
removable, but it’s a lot more complicated than you might think! There are four
major components built into your iPhone’s display:
1.
The LCD screen, which displays
the images you see on your iPhone.
2.
The digitizer, which is the
part of the display that processes touch. It digitizes your finger, which means
it turns the touch of your finger into a digital language your iPhone can
understand.
3.
The front-facing camera
4.
The home button
Each component of your iPhone’s display has
a separate connector that plugs into your iPhone’s logic board. That’s why you
might be able to swipe across the screen with your finger, even though the
screen is black. The digitizer is working, but the LCD is not.
In many cases, your iPhone screen is black
because the cable that connects the LCD to the logic board has become
dislodged. This cable is called the display data connector. When the display
data connector becomes dislodged from the logic board, your iPhone can be fixed
by plugging it back in.
There are other cases where the fix isn’t
so simple, and that’s when the LCD itself is damaged. When that happens, it
doesn’t matter if the LCD is connected to the logic board or not – it’s broken
and it needs to be replaced.
How
Do I Know Whether My Display Is Dislodged Or Broken?
I’m hesitant to write this because it is by
no means a hard and fast rule, but I have noticed a pattern in my experience
working with iPhones. There are no guarantees, but my rule of thumb is this:
l If your iPhone display stopped working after you dropped it, your
screen is probably black because the LCD cable (display data connector) has
become dislodged from the logic board.
l If your iPhone display stopped working after it got wet, your screen
is probably black because the LCD is broken and needs to be replaced.
How
To Fix A Black iPhone Screen
The way you choose to proceed may depend on
whether your iPhone LCD cable has become dislodged from the logic board or if
the LCD is broken. You can use my rule from above to make an educated guess.
If the LCD cable has become dislodged, the
Genius Bar at an Apple Store may repair it free of charge, even if your iPhone
is out of warranty. That’s because the fix is relatively simple: They’ll open
your iPhone and reconnect the digitizer cable to the logic board. If you decide
to go this route, make an appointment with the Genius Bar before you arrive –
otherwise, you could end up standing around for a while.
If the LCD is broken, that’s another story.
It can be very expensive to repair your iPhone display, especially if you go
through Apple. If you’re looking for a high-quality, less-expensive
alternative, I recommend iCracked.
Repairing
Your iPhone Yourself Usually Isn’t A Good Idea
iPhones aren’t meant to be opened by the
user. Just take a look at the two screws next to the charging port of your
iPhone – they’re star-shaped! That being said, there are excellent repair
guides out there if you’re feeling adventurous. There is a repair guide article
on iFixit called “iPhone 6 Front Panel Assembly Replacement”. Here’s a brief
excerpt of that article that may sound familiar:
“When reassembling your phone, the display
data cable may pop off its connector. This can result in white lines or a blank
screen when powering your phone back on. If that happens, simply reconnect the
cable and power cycle your phone.”
If you believe your iPhone LCD cable
(display data cable) has simply become dislodged from the logic board, you’re
very tech-savvy, and going to an Apple Store isn’t an option, reconnecting the
display data cable to the logic board isn’t that difficult, if you have the
right tools. Replacing the display is very complex because of the number of components
involved. Let me be clear: I do not recommend you try to fix this problem
yourself, because it’s just too easy to break something and “brick” your
iPhone.
You
Know What You Have To Do
Most readers won’t be able to fix their
iPhone screen just by reading this article, because a black iPhone screen
usually isn’t caused by a software issue. Everything was working fine until
your iPhone screen went black. Now you can’t use your iPhone at all, but you do
know what to do next. I’m interested to hear how you fixed your iPhone in the
comments section below, and any experience you can offer will undoubtedly help
other readers with the same problem.
Wednesday, February 17, 2016
Top 4 Ways to Tell An Original iPhone 6 screen from A Copy One
There are many kinds of iPhone 6 screen replacement in the market. Some of them are 100% original from Foxconn, Some are original parts but assembled by OEM factory, and some others are copy parts made by OEM factory. They are different in quality and price. It is not so easy for a user to distinguish them. Even for smartphone repair store, they always consider the copy LCD screen to be original. Below are the difference between them.
1. Flex Cable
All the original flex cable has apple logo on the ribbon. But those copy flex cable has no logo, or use other logo. So you can check the LCD flex cable and digitizer flex cable carefully, it is easy to find the difference.
2. LCD
Original LCD has a stamp on the backside of LCD, but those copy LCD has no this stamp.
3. Frame
Also, original frame has a stamp on the left up corner of back side, but copy frame never has this stamp.
4. Digitizer/Touch Screen
Original front glass for iPhone 6 is fixed with a special electroplating film on surface. It bring anti-sunshine effect to the screen. When you stare at the camera hole of digitizer under the sun, the sunshine will change into purple. This technology make the original iPhone 6 screen display very well even under the sunshine. But consider the cost, all copy digitizer don't use this technology. If you wear a sunglass, and operate the smartphone, the original screen will display perfectly, but the copy digitizer shows nothing.
 |
1. Flex Cable
All the original flex cable has apple logo on the ribbon. But those copy flex cable has no logo, or use other logo. So you can check the LCD flex cable and digitizer flex cable carefully, it is easy to find the difference.
2. LCD
Original LCD has a stamp on the backside of LCD, but those copy LCD has no this stamp.
3. Frame
Also, original frame has a stamp on the left up corner of back side, but copy frame never has this stamp.
4. Digitizer/Touch Screen
Original front glass for iPhone 6 is fixed with a special electroplating film on surface. It bring anti-sunshine effect to the screen. When you stare at the camera hole of digitizer under the sun, the sunshine will change into purple. This technology make the original iPhone 6 screen display very well even under the sunshine. But consider the cost, all copy digitizer don't use this technology. If you wear a sunglass, and operate the smartphone, the original screen will display perfectly, but the copy digitizer shows nothing.
Thursday, February 11, 2016
How to Fix iPhone 6 Plus Headphone Jack Not Working?
iPhone 6 Plus headphone jack not working? Worried about an expensive repair that means you’ll have to go without your phone for several days or even weeks? If you’re a bit tech savvy, you can repair or replace your own iPhone 6 Plus headphone jack with the following DIY guide.
iPhone 6 Plus Headphone Jack Repair
Start by ensuring your headphone jack is the culprit by trying a different set of headphones with your iPhone 6 plus or by trying your headphones with a device you know is working. If the headphones work, make sure your headphone jack is clear of dust, dirt, lint, and other debris that might be preventing a secure connection between your headphones and headphone jack.
You can clean your headphone jack by blowing compressed air into it or by using a cotton swab or needle covered with double-sided tape to gently swipe out any dust and debris. If you know your headphone jack is clean and it still won’t work, you’ll need to replace it.
iPhone 6 Plus Headphone Jack Replacement
What you need:
P2 Pentalobe screwdriver
Small Phillips screwdriver
Pry tool
Spudger
Tweezers
Suction cup
How to replace your iPhone 6 Plus headphone jack (lightning connector and headphone jack assembly)
STEP 1: Remove the two screws adjacent to the lightning connector at the bottom of your iPhone 6 Plus.
STEP 2: Place the suction cup near the bottom of the front screen, then lift so the front screen assembly hinges at the top. You might need to use your pry tool to gently pry at the seam to get it started.
STEP 3: Remove the five front panel assembly cable screws, then remove the bracket.
STEP 4: Use the pry tool or spudger to disconnect the front camera cable connector, home button cable connector, display data cable connector, and digitizer cable connector. You can now remove the front screen completely.
STEP 5: Remove the two battery connector bracket screws, then remove the bracket.
STEP 6: Use the pry tool or spudger to disconnect the battery connector, vibrator connector, and antenna cable connector.
STEP 7: Use the tweezers to remove the antenna cable from its channel. You might need to finish this after STEP 8.
STEP 8: Remove the two vibrator screws, then use the tweezers to remove the vibrator. If you weren’t able to fully remove the antenna cable from its channel in STEP 7, do it now.
STEP 9: Remove the two speaker screws, then remove the speaker.
STEP 10: Remove the two lightning connector/headphone jack assembly bracket screws, then remove the bracket.
STEP 11: Use the spudger to disconnect the antenna cable. You can now remove the antenna cable completely.
STEP 12: Remove the nine lightning connector/headphone jack assembly screws.
STEP 13: Use the tweezers to remove the clip located to the right of the headphone jack.
STEP 14: Use the pry tool to gently pry the lightning connector/headphone jack assembly from its underlying adhesive until you can remove it completely.
STEP 15: Insert the replacement lightning connector/headphone jack assembly, then follow these steps in reverse order to reassemble your iPhone 6 Plus.
Wednesday, January 20, 2016
Complete Guide to Replace an iPhone 6s Screen
If you accidentally crack your new-bought iPhone 6s screen you can following the detailed steps below to repair your phone.
Step 1
Turn off your iPhone before starting disassembly. Take out the two 3.4 mm Pentalobe screws around the Lightning connector.
Step 2
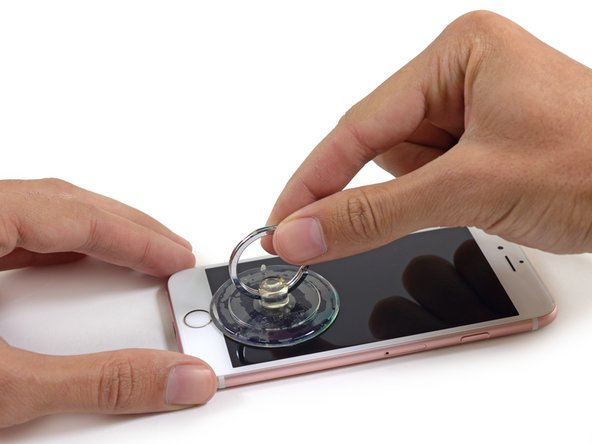
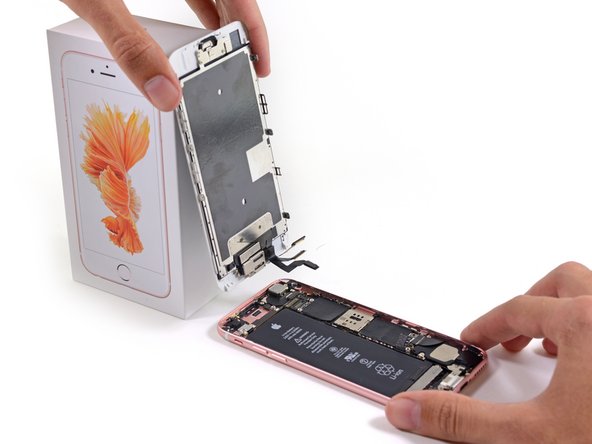
Press a suction cup onto the screen, just above the home button. Be sure the cup is pressed firmly onto the screen to get a tight seal. Pull up on the suction cup to slightly split the front panel assembly from the rear case.
Step 3
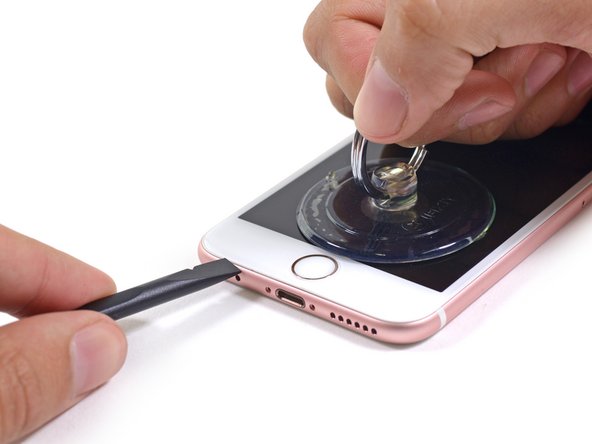
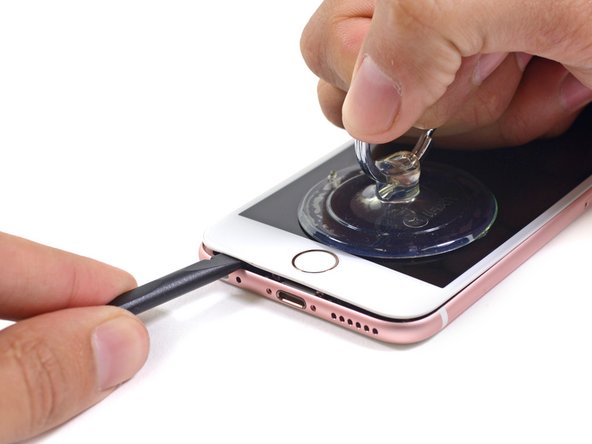
There is a notch on the underside of the display just above the headphone jack that is the safest place to begin prying the phone open. Pull up on the suction cup to slightly separate the front panel assembly from the rear case. Take your time and apply firm, constant force. The display assembly is a much tighter fit than most devices and is held down with adhesive. Once a small gap has been opened, insert the flat end of a spudger above the headphone jack. Keep pulling up on the suction cup while twisting the spudger.
Step 4
Twist the spudger to open the gap more and break it free from the adhesive. Keep pulling up on the suction cup while twisting the spudger.
Step 5
Use the edge of a spudger to slice through the adhesive on either side of the phone.
Step 6
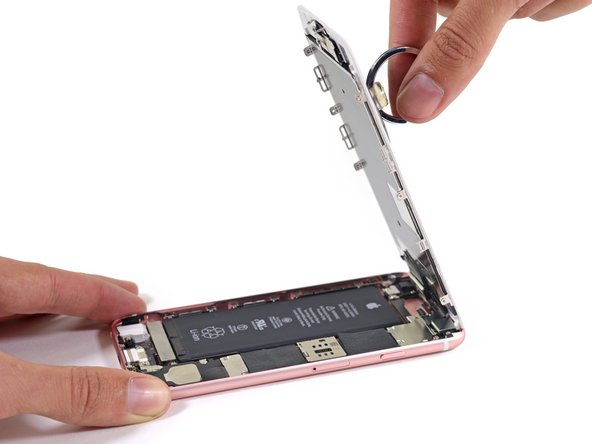
Use the edge of a spudger to slice through the adhesive on either side of the phone. Don't open the display more than 90 degrees, as it is still connected at the top by three cables that may break if stretched.
Step 7
Use the suction cup to open the display, breaking the last of the adhesive. Don't open the display more than 90 degrees, as it is still connected at the top by three cables that may break if stretched.
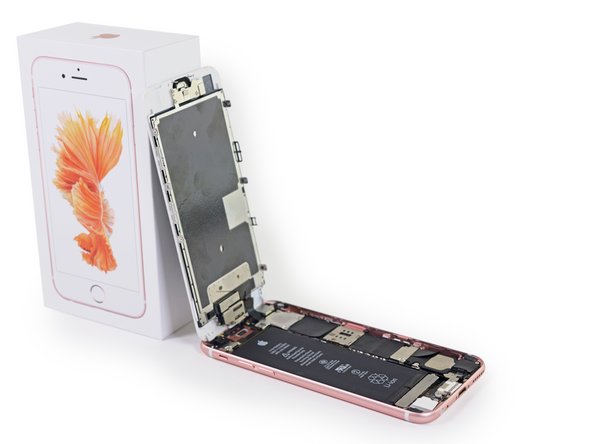
Step 8
Lean the display against something to keep it propped up while you're working on the phone.
Step 9
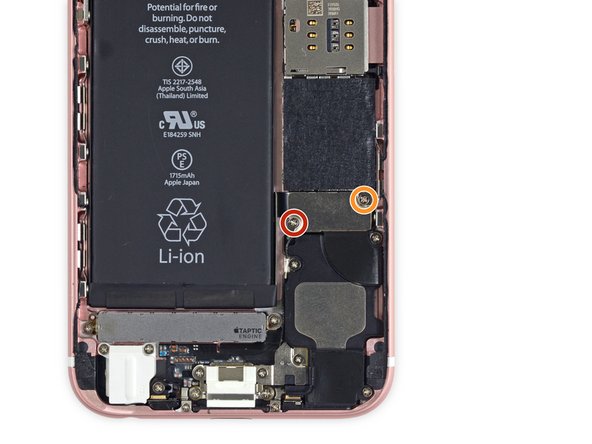
Remove the following screws from the battery connector bracket:
One 3.0 mm Phillips #00 screw
One 2.3 mm Phillips #00 screw
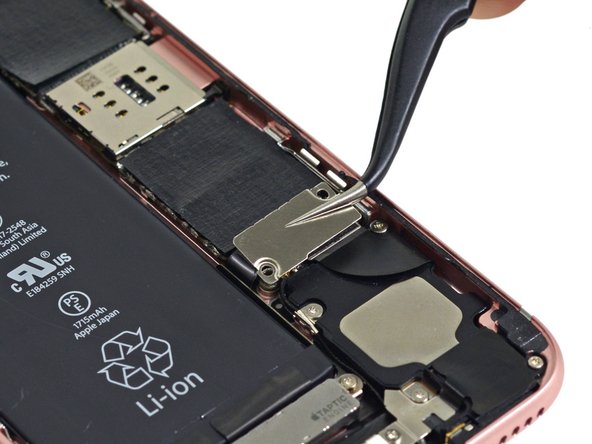
Step 10
Remove the metal battery connector bracket from the iPhone. Push the connector to the side to ensure it doesn't accidentally make contact and power on the phone while you're working on it.
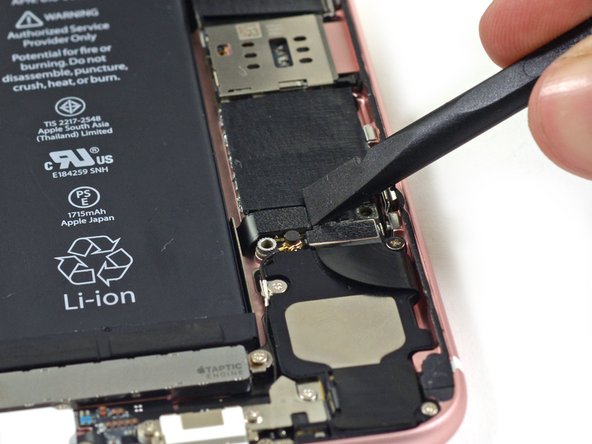
Step 11
Use the flat end of a spudger to disconnect the battery connector from the logic board. Push the connector to the side to ensure it doesn't accidentally make contact and power on the phone while you're working on it.
Step 12
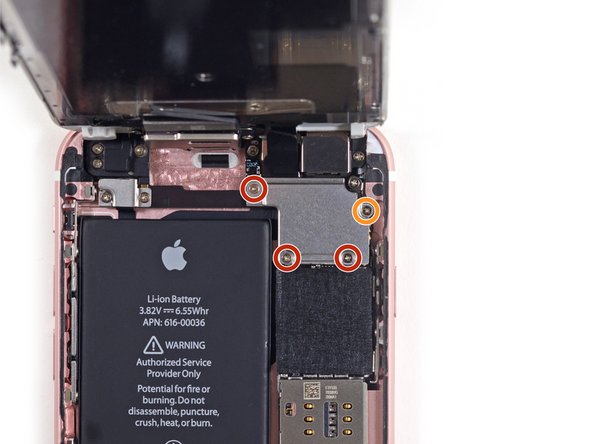
While holding the front panel open at about a 90 angle, remove the following screws securing the front panel assembly cable bracket:
Three 1.3 mm Phillips #00 screws
One 3.0 mm Phillips #00 screw
Don't lose track of this screw! It's very important that the one 3.0 mm screw goes in the top-right corner of the plate. Anywhere else may cause damage to the logic board.
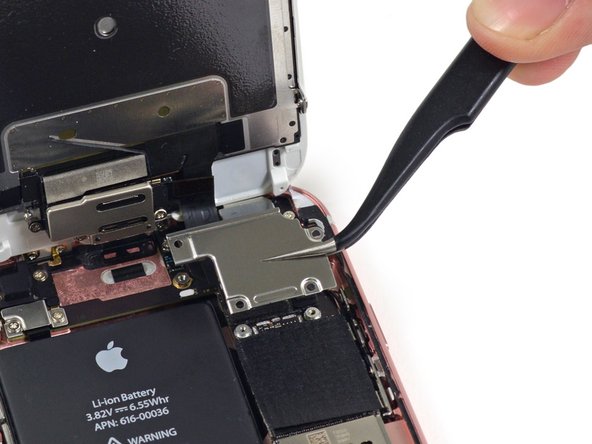
Step 13
Remove the front panel assembly cable bracket from the logic board.
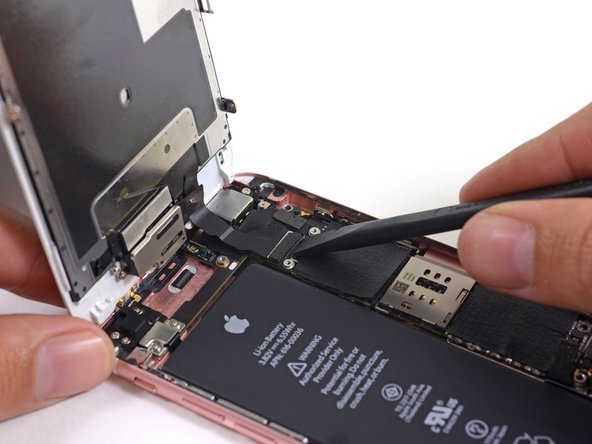
Step 14
In the next three steps, take care to pry up only on the cable connectors, and not on their sockets on the logic board. Use the flat end of a spudger to disconnect the front-facing camera and sensor cable connector.
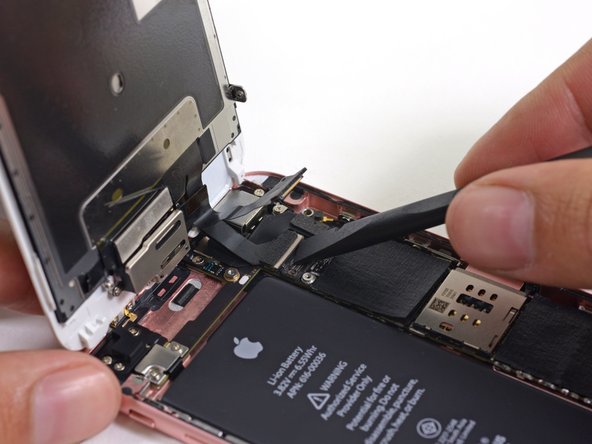
Step 15
Use the flat end of a spudger to disconnect the display data cable connector.
When reassembling your phone, the display data cable may pop off its connector. This can result in white lines or a blank screen when powering your phone back on. If that happens, simply reconnect the cable and power cycle your phone. The best way to power cycle your phone is to disconnect and reconnect the battery connector.
Step 16
Finally, use the flat end of a spudger to disconnect the digitizer cable connector.
Step 17
Remove the display assembly from the rear case.
Step 18
Replace with a new iPhone 6s screen replacement and then reassemble the phone following the reverse steps.
How to Repair a Cracked Screen on iPod Touch
The iPod Touch screen consists of two parts: the outer glass, and the lcd digitizer. Both of them are prone to be smashed. Here are 2 options to replace your broken iPod touch screen:
Option 1: Replacing the LCD Digitizer
1. Carefully remove the chrome back with a flathead screwdriver. Do this by slipping the tool into the gap between the chrome back and the front faceplate.
2. Place your iPod face down on a table or other surface. You now need to remove the rechargeable battery. Prying it upward carefully. It is glued to the iPod so it'll take some effort to remove it.
3. Remove the logic board. It is attached to the battery and is secured with 4 screws. Keep the screws safely nearby.
4. Take out the liquid crystal display (LCD) digitizer. The digitizer is held in place by 16 tiny screws. Keep the screws in a safe place.
5. If applicable, replace the broken digitizer with a new one. Do this by unplugging your broken LCD screen carefully (you can see the black plug in the image), then plug in your new LCD screen.
6. Put your iPod back together by reversing these steps. If you are replacing your outer protective screen proceed to the next step.
Option 2: Replacing the Faceplate
1. Now that your detached screen is ready to be repaired, remove the square 'home' button and set aside.
2. Lay the faceplate face up and heat with a hairdryer. The adhesive holding the screen to the faceplate needs to be heated to separate the two. Remove and discard the cracked screen.
3. Now replace your 'home' button and lay your replacement screen over your faceplate.
4. Heat the faceplate with your hairdryer to allow the adhesive to bond with the screen.
5. Let your screen cool down and make sure that it has adhered to the faceplate completely.
6. Put your iPod back together carefully by reversing these steps.
Subscribe to:
Posts (Atom)


